Just Kitting Studio Items for Sale

Wednesday, November 30, 2011

Art Philosophy flower wreath and matching card

Today I made a Birthday gift and matching  card  for my dear friend.  The flowers are cut from Double sided paper from page 70 of the Art Philosophy cart at  2.5 inches.  I used double sided paper.  I love making these rolled flowers.  
 

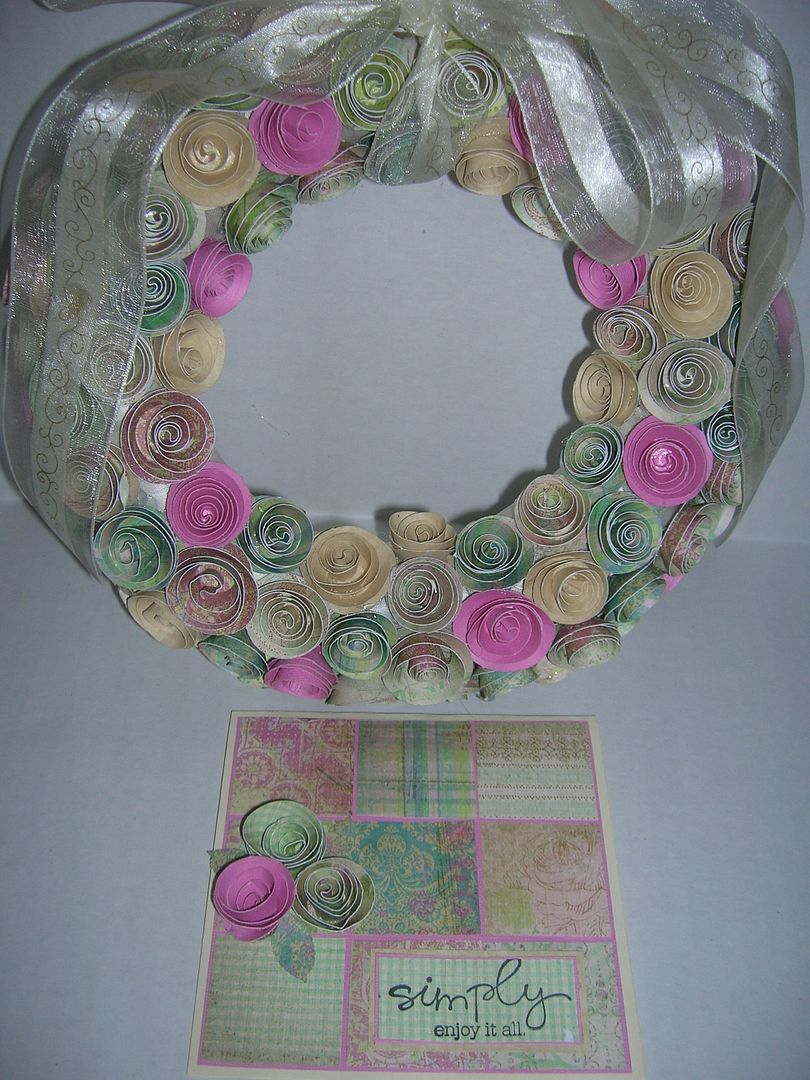
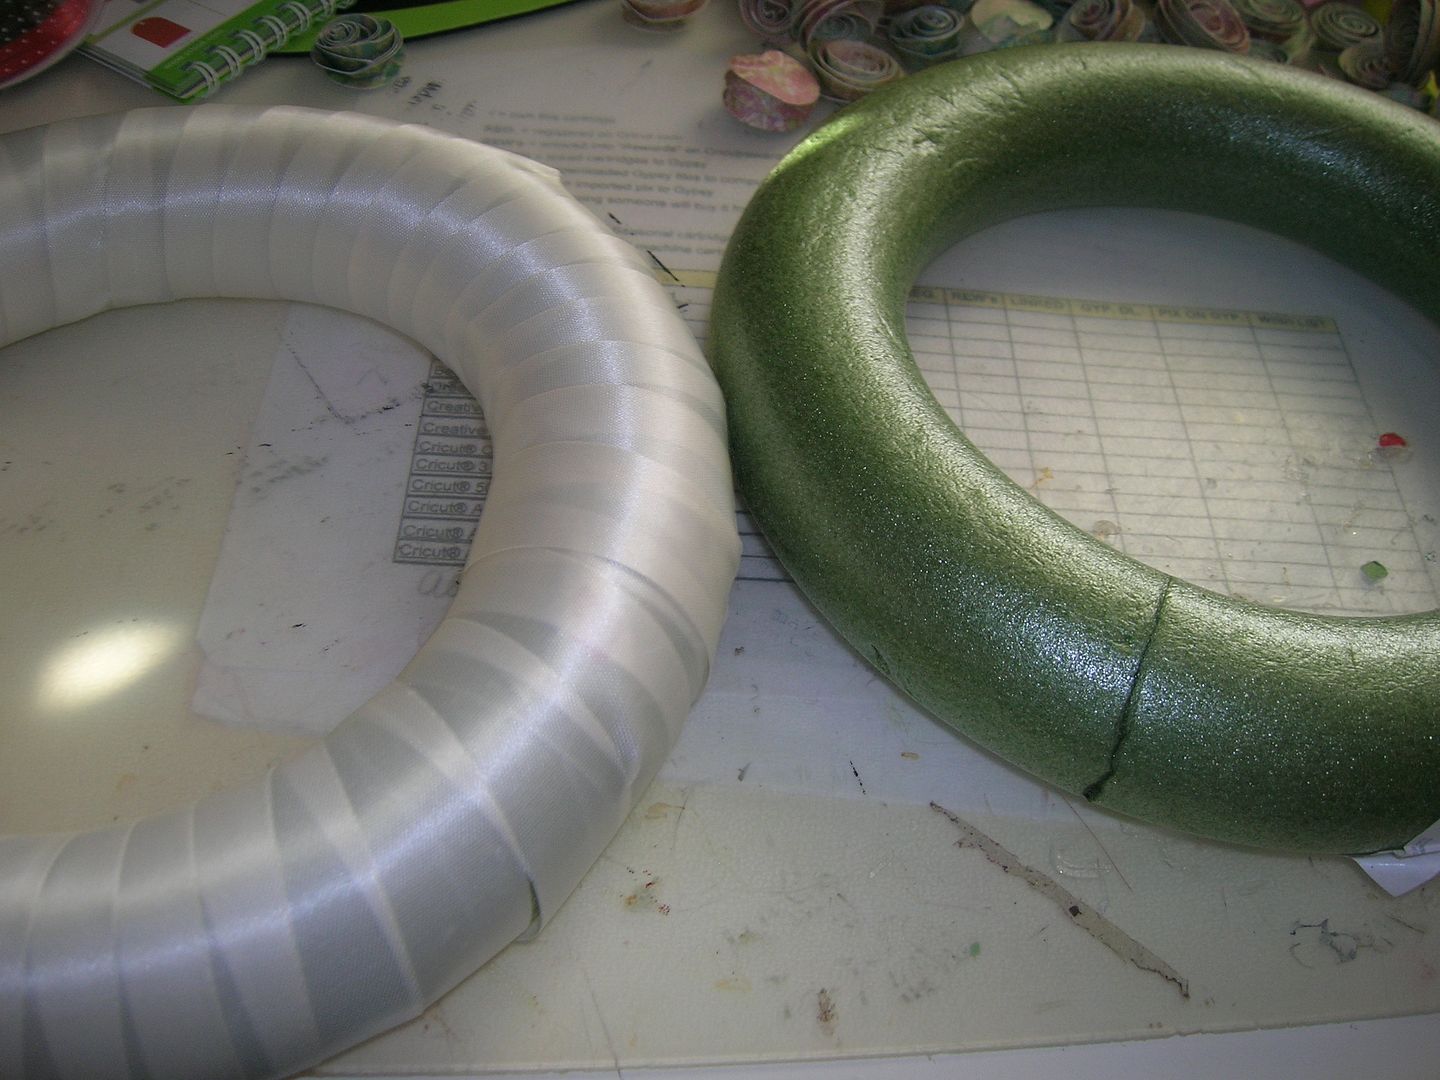
I used a small green foam wreath that I got in the clearance at my local M's.  There were two and both were broken so they were only 50 cents each.  I wrapped the foam wreath with cheap white ribbon.  
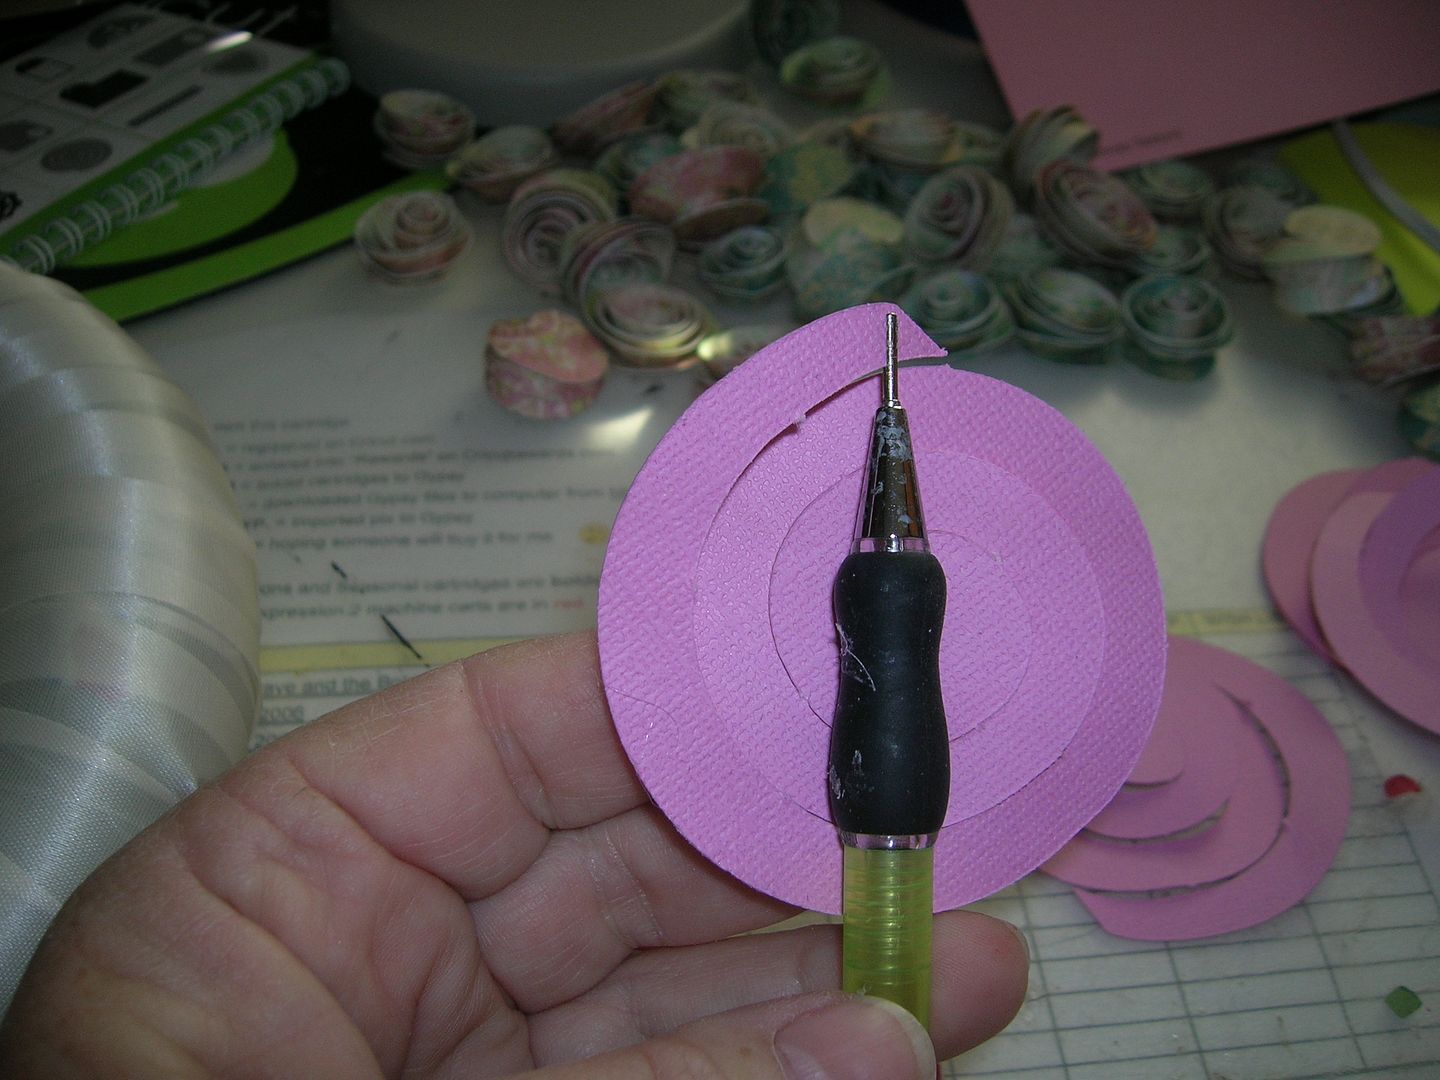
For these flowers you start at the end and roll.  I am using the Cuttlebug quilling roller.  If you don't have one of these get a quilling pen at the craft store.  The end inserts around the paper so you can roll it easily.  On a 12 x 12 sheet I get 16 flowers.  You can see the stack of flowers in the back.  Once you roll them you release them and they loosen up and then I glue them with the glue gun.  
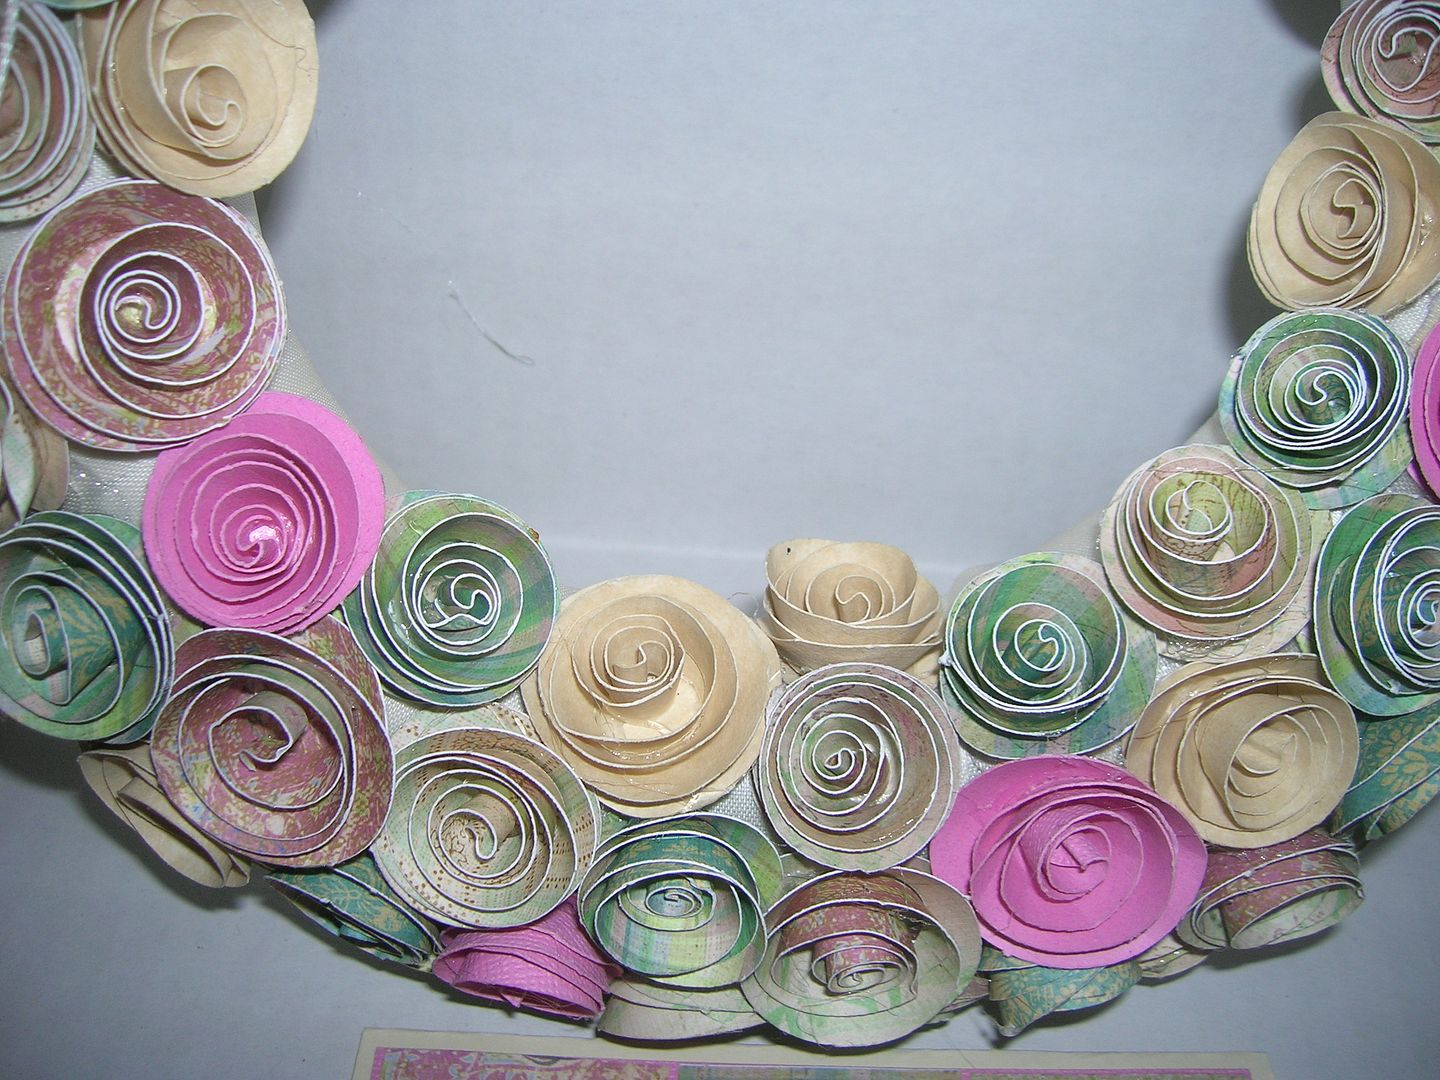
Here is a closeup of the flowers glued with glue gun to the wreath. 
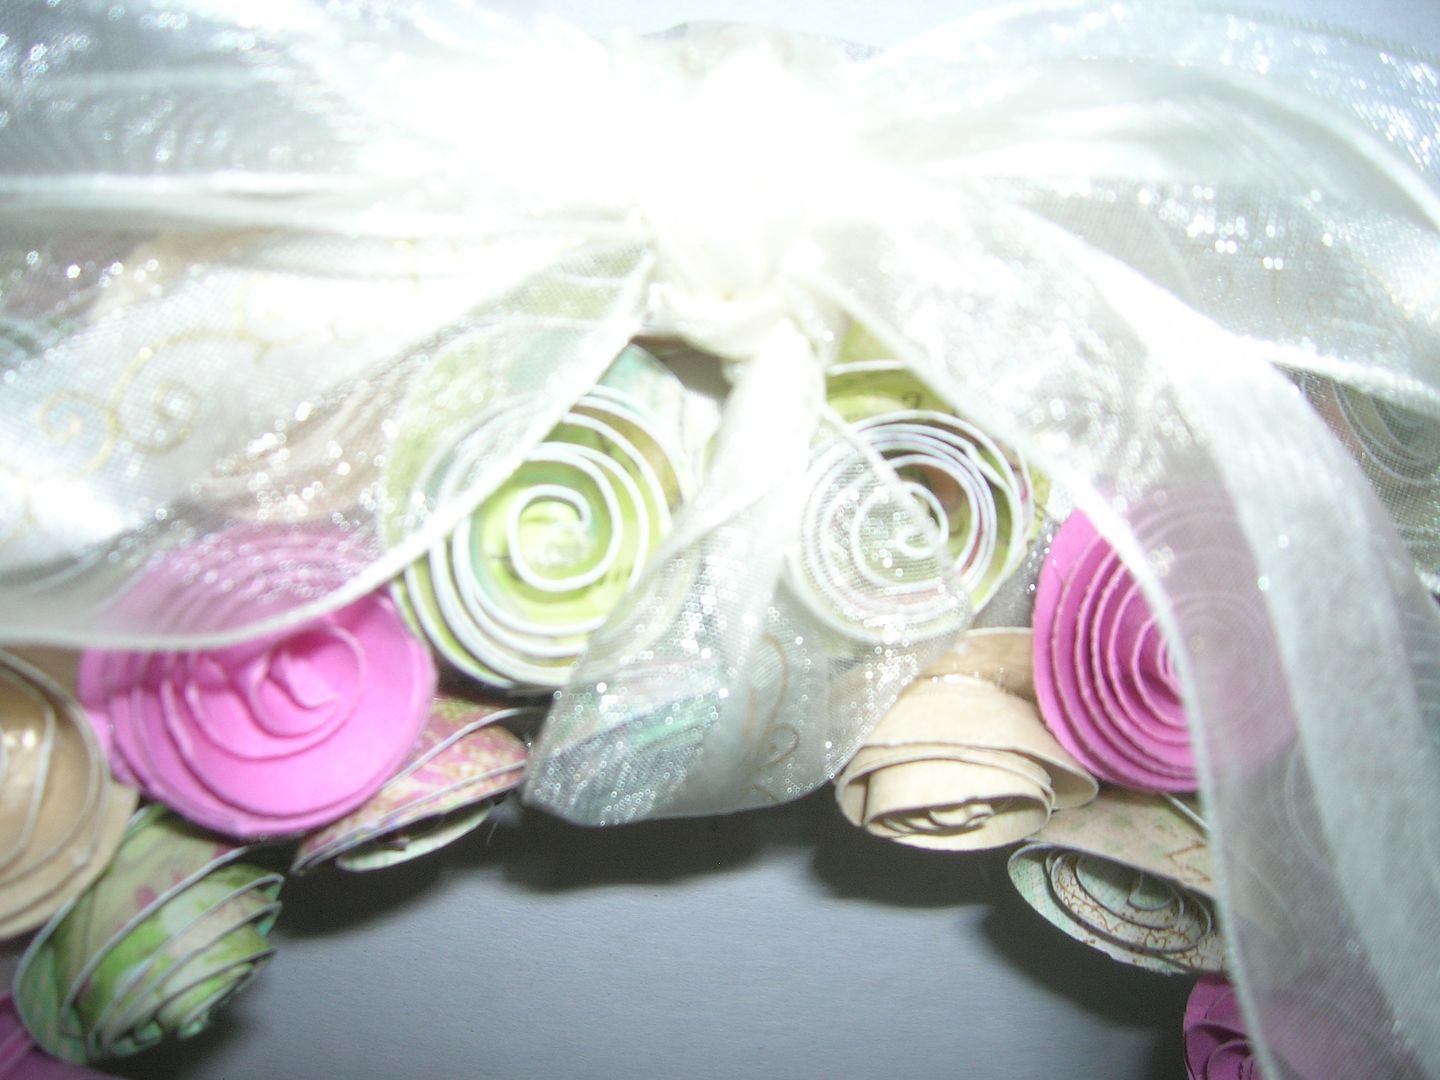
I tied a wide ribbon at the top 

I then remembered a sketch I had seen for a birthday card challenge at Celebrate the Occasion and thought it was perfect for the scraps I had left from the flowers.  The card is 5 x 5 and the squares are cut 1 1/2 x 1 1/2 inches.  I used three flowers and cut out 3 leaves with a punch.  Stamp is a $1 stamp from Michaels.  
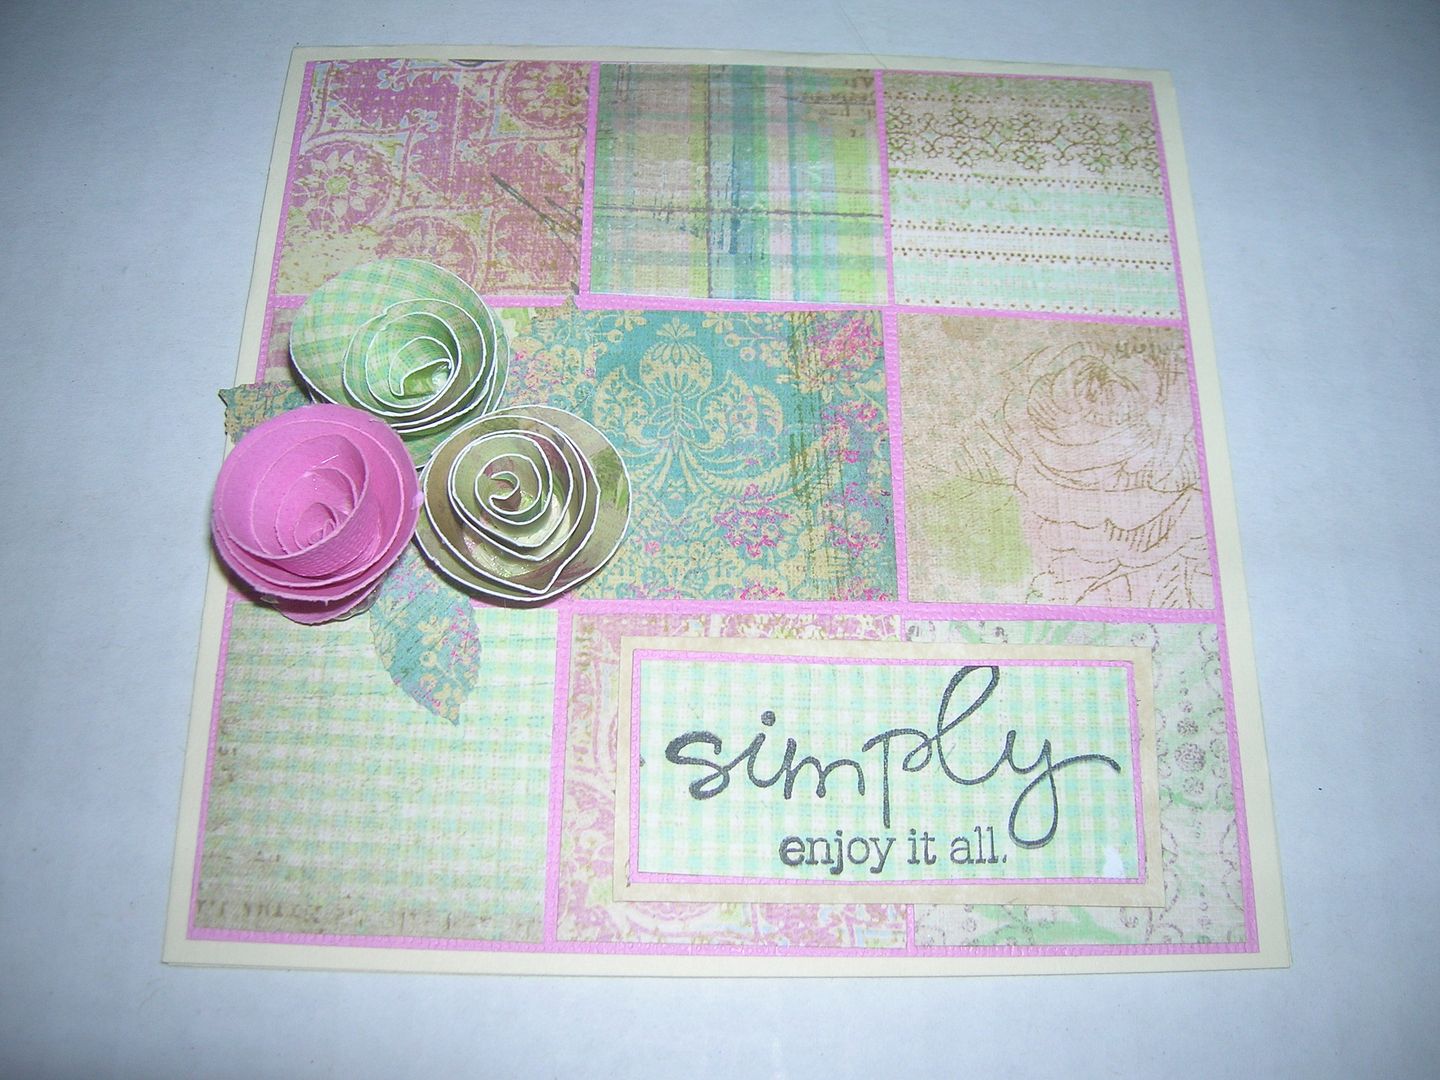
Here is the sketch. 
Inside of card.  
I am entering the card in the Celebrate the Occasion challenge - Birthday Sketch card 
and the wreath in Cooking With Cricut Show us your project with a candle, wreath or pine cone 


Blue and White snowflake card from Sophie

Yesterday was a hectic day.  After three stores I got the cord I needed to download the Cricut handbooks to my new Kindle Fire.  But first I printed a list of all the carts on Cricut.com.  I  caught up on downloading the handbooks to my computer.   I sure wish PC would load all the carts that are missing!  Then I downloaded them to my Kindle Fire.  This was quite the process but now I feel super organized.  All my 190+ carts are loaded on my third replacement Gypsy and all the handbooks are on my Kindle Fire.  So now I am super duper organized again.  
I did make one card yesterday for two challenges.  However when I went to load it on Blogger I couldn't get on so had to wait until today.  The card base with the 4 cut out snowflakes on the bottom is from Sophie, as well as the base of the snowflake and the snowflake. I placed a doily under the snowflake and the ribbon is from Michaels.  The white rectangles are embossed with a Cuttlebug snow folder and adding some gems I had in my stash.  I stamped the sentiment Noel in blue to match and embossed it with Crystal embossing powder.  
I am entering this in the 
Cricut Circle Magazine Challenge -3 cuts with the Sophie cartridge
 to make a holiday project with a sketch 
Robin's Creative Cottage  Challenge #1 "Let it Sparkle"
create a project and add anything that shines or sparkles... glitter, jewels, tinsel etc...
Check out Robin's new blog and stamps.  I have already ordered mine.  
She's a Sassy Lady Challenge 

Monday, November 28, 2011

Holiday Card FCCB using charms

Hi everyone! I don't know about you but last month went by so fast and last week was a complete blur for me.  So now we are full on in to Christmas mode and preparation.  So this is the perfect time for the this weeks Fantabulous Cricut Challenge to make a holiday card.  This week our sponsor is 
I was so lucky to be selected to use some of the Creative Charms product on my project this week.  
I must say I was very impressed with the quality Christmas items they sent me.  I will be using them on my card for today and the card I made for the Thursday Tutorial.  
For todays card I started with the Cuttlebug Embossing folder Plus- Brocade Window.  This is a 5 x 7 embossing folder and I love sanding the embossing.  
I then placed a vintage photo inside from TJ Designs Children's Christmas Collage Pack
I added ribbon from Michaels and tied twine in three places.  
The snowflakes were cut from Art Philosophy and I added Creative Charms that spelled Joy on the left along the ribbon.  I also added Creative Charm gems to the snowflakes.  Aren't they pretty?  I just love them.  The background paper was some vintage look paper I got at LSS for 25 cents.  
Also entering this  in the My Craft Spot   Christmas Through the Window Challenge 
I hope you will join us for the FCCB challenge this week.  This is a great challenge to get those creative juices going if you haven't started your Christmas cards yet.  I will let you in on a secret.  Last year I only made one card so this year I have been making a couple cards each month so I have a great stock pile.  So see you at the challenge and again for the Thursday Tutorial.  Happy craftin!

Sunday, November 27, 2011

Nov 27th Lasting Memories Color and sketch challenge

Boy did this week go fast.  With traveling to relatives for 4 days, having oldest granddaughter (22 months) for two days, Thanksgiving and shopping this week flew by.  Today my goal is to finish loading all my carts onto my replacement Gypsy. With almost 200 carts and being the third time I have had to do this it is an exhaustive process.  I hope third time is the charm.  
 So for my layout today for the Lasting Memories color challenge  I am going to be totally honest with you,  I did this layout before I to visit family for Thanksgiving week.   I totally forgot to write the info down or lost it for this layout.  I finally found  the large circle and you and me on  Lacey Labels.    The pictures are of my  3 grandbabies.  Not an orange person but I loved the purple, orange and hot pink combo.  I used the cut out leftover on the right.  Used the teardrops from large cut on left to make base of flowers on the right.  
Paper is Pocket of Posies Stack from DCWV

Hope you will join us this week for the Lasting Memories Color Challenge.  We would love to see how the picture and sketch inspires you.  You have until Saturday December 3rd.  

Nov. 27th SSD Trim a Tree Challenge

Wow so hard to believe it is the end of November and Christmas is only a month away. I hope you all had a wonderful Thanksgiving with your loved ones.  This is the time that we are all super busy with the hustle bustle of the holidays and Christmas crafting.   Our fearless leader Bobbi Jo asked the Design Team to come up with some ideas for challenges and this week I came  up with 
"Trim a Tree"- Design a project to hang on your tree.  
I actually saw a project like this on Pinterest (my newest addiction) but with real wood blocks.  So I got out my Tags, Bags, Boxes and More and started my ornament.  
At first I cut the box from page 119 at fit to page and it was way to big.  So next I cut the box at  5.5 inches At that size I was able to fit two boxes on a page and it was a great size for an ornament when I stacked three together.   
I used paper in my stash from last year that was fairly stiff so the boxes would hold their shape better. 
The paper can be single sided as the other side will not show.   
Once the boxes are cut  I folded along the score lines.  
I punched pictures with this handy two inch punch from my "extras" stash.  I glued my pictures on with the glue gun.  I glued mine on after I made the boxes however I would recommend you glue them on while the box is flat so you don't have to worry about smashing your boxes.  
I had these cute little buttons I got last year on clearance and I glued them on the corners.  
Hope you like my project and will come back all week to see what all the Design Team has made.  I can't wait to see what  all the DT creates.  

Saturday, November 26, 2011

Blog Quick Quotes Challenge- white space and sketch

I was lucky enough to attend a Blog Quick Quotes class at the Ontario Scrapbook Expo with Lisa.  I bought some paper so I was excited to break it out and create a layout today for the current challenge.  Blog Quick Quotes
white space challenge/sketch
Check out day one of the blog Hop 
and don't miss the 40% off sale ,
I ordered some more paper and the entire set of chalks as I love them.

For this layout I used the beautiful Live Out Loud paper and chalked all the edges with QQ Blue Hawaiian chalk.  The leaf ribbon is Martha Stewart, the butterflies are K and Company and the flowers Recollections from Michaels.  
Here is the sketch 
Close up of flowers and ribbon.  

I can't wait to make the second page of the layout with these gorgeous papers.  

Check this out I used birthday table decorations for Birthday layout

A few weeks ago I posted these 
  table decorations I made for my granddaughters first birthday.  I then saved the table decorations and use  the cut outs for layout pages.  I used Baby Steps, Paisley and Something to Celebrate for the cuts.  
  I started  entering the DCWV  challenge a couple months ago and it is a lot of fun and easy to do since I buy so much DCWV paper. I decided this would be a good time to start the birthday layouts with my cutouts and using the DCWV Sweet stack.  
Here is the link to the DCWV  Diary Monthly Challenge 
I am also entering this layout in  Amanda Crafts and More challenge which is to use embossing.  
The owl and the title are embossed.   
DCWV sketch 
Here is where I got the cutouts.  These are the table decorations I made for my granddaughters first birthday a couple weeks ago.  I then save the table decorations and use some of the cut outs for layout pages.  I used Baby Steps, Paisley and Something to Celebrate for the cuts.  

The sketch page and the matching page.  
Closeup
Closeup
Doily and ribbon closeup

Friday, November 25, 2011

Christmas layout using Rosettes and Ribbons

It sure felt good to scrap today after a crazy week.  We left last Saturday and spent 4 days visiting some of my husband's cousins.  On the way home we picked up my 22 month old granddaughter.  She stayed with us  for two nights, which was her first time, and we had a lot of fun.  Then a great day with family and friends for Thanksgiving.   My new Gypsy arrived from PC while I was gone so today I spent much of the day updating my machines and my Gypsy.  So all my crafting was done  with carts and my E2 today.  
Christmas Layout
I got some really cute Recollections Christmas paper at Michaels yesterday and decided to start my Christmas layouts.  I used the sketch from Frosted Design to create my layout.  
The large medallion is from page 63 of the Rosettes and Ribbon cart cut at 9" on shadow. 
The circle is from the same cart page 21 at 4 1/2". 
The little gingerbread man is From My Kitchen and was cut at 4 1/2".  
The red cut out felted ribbon and the cream ribbon are from Michaels.  
The star buttons are from Joanns.  
I also used twine, Pearl Pen, and assorted little buttons for the gingerbread man.  
Cream shiny cardstock was used to make a border with a MS punch.  


Thanks for stopping by and hope you will leave a comment.  Also hope you all had a wonderful Thanksgiving with your family and friends.  Happy Craftin!

Winner of the My Memories Suite Software


Today is the day to choose a winner of the My Memories Software.  There were 6 followers who commented so I did a random drawing and #1 was the winner.  Congrats to the winner Jenny who said


jennyplace2 said..


OMG! Such pretty layout with such lovely little girls. Looks like such a fun program, would love to win it for my BFF Pee Wee. we have both liked Memories Suite on facebook and check out there blog. Thanks for the chance to win.
Congrats to Jenny and thank you to those who commented.  Remember you can use my code on my blog to get a $10 discount on the software which means it is $19 and you also get $10 off digital files to use with your software.  


1Powered by RANDO

Wednesday, November 23, 2011

Happy Thanksgiving and Last day for the My Memories software give away

Happy Thanksgiving to all my followers.  I am so blessed to have you as my crafty friends and followers.  I hope you all have a wonderful Thanksgiving with your families and friends.  Also best of luck to those of you who shop Black Friday.   
Don't forget tomorrow is the last day for you to comment for a chance to win My Memories Software.  I will select the winner on Friday.  So check out the link and see what you need to do to be a winner.

Sunday, November 20, 2011

Lasting Memories DT Photo Inspiration Challenge- Magic of Winter

The challenge this week at Lasting Memories is to choose one of three inspirational photos.  I loved all three photos but blue is my favorite color so went with that one.  I decided to make a a winter layout.  The title the Magic of Winter comes from Winter Woodland and the little snow people are from SnowFriends.  I also used a new MS snowflake punch.  It actually makes 1/2 a circle so I cut strips at 2 1/2 inches to make the entire round punching it on both edges.  I added circles underneath ( 2 inches cut from George) to let the border pop.,.  I also added the 1/2 border under the two mats.  I used Peachy Keen stamps for faces and Smooch Ink for noses.  The paper is all from a DCWV stack Winter Wonderland from last year.  
Closeup- Used EK Success punch on corners.  Pictures will slide in where silver paper is.  
Magic of Winter Winter Woodland page 68 cut at 5 inches

Love these little snowmen.  Snowman and Snowlady cut from  Snow friends at 5 inches
I hope you will join us with the challenge this week.  Check out the three pictures and get your creative juices flowing. We would love to see what you made.  Have a Happy Thanksgiving and see you next week at Lasting Memories or you can join me sooner on my blog.  
 Happy Craftin!

Saturday, November 19, 2011

Winner of FCCB Cricut Crawl Blog Candy and a thank you to my followers

Hi everyone- Today is the day I am randomly choosing a winner for the Fantabulous Cricut Harvest Blessings Crawl we have been having this week at Fantabulous Cricut Challenge Blog.  I hope you have had a chance to view all the wonderful projects by the Design Team as well as all the entries for the challenge.  So many beautiful things. I used Random.org to select the winner out of 34 comments and the winner is #21. And the winner is
 AJ Scrapbooking and Cards said...


Wow great job on your wall decor. I don’t do much decor but with instructions I believe I can get it done. Thanks for sharing. I’m a follower. Blessing AJ

Congratulations and thank you for your sweet comment.
Thank you to all and I hope you enjoyed the crawl and the challenge. Your comments mean so much to me and that you take the time to stop by my blog to see my projects.  There are so many blogs, websites, messageboards and things to see now days I feel very honored for each of you that spends time visiting me.   Also I was very excited to make my 400 followers goal this week and now on to 500.  Thank you so much to all of you who follow me I hope you enjoy my blog and will come back again and again.  More prize drawings to come.  :)

  21
Also don't forget you have 5 more days to leave a comment to win the My Memories Suite Software.  
 I will choose the winner on Black Friday so you have a few more days to read about it and leave a comment.  Also on my post you will find some layouts I did in a matter of just a few minutes.  I was amazed at how quick and easy and fun it is.  So check it out.  


Friday, November 18, 2011

Christmas cone tree using border cut

This week on the Cricut Circle Blog the challenge was to make a project using a border cut.  Right away I knew what I wanted to make for the challenge.    I have seen cute little trees like this and thought I would try to make one using my Cricut. I hunted through the border cuts and decided to use a  scalloped border from Holiday cakes. 
I had a cone from Michaels.  
I glued a strip around the bottom to make sure the edges were covered.  I used a glue gun.  

  I cut full page sheets of  the border from different papers. The paper I used was double sided so I had a variety of choices to layer.   
At first I tried v cuts and curved scalloped edges up.  
Then I switched to cutting slits on opposite edge and that worked the best.  
This aids when gluing as you can overlap as your gluing around the curved cone.  
At first I started with 5.75  long borders.  As I progressed it worked to cut pieces.  So by the time I got to the top I was gluing two scallop long pieces  at a time.  
To finish the top I folded over one scallop from the border and made a pocket to glue on top.  
Here it is.  
I added gems with Tacky Glue.  
Art Philosophy star cut  at  3 inches.  Fold each star  in the  middle, ink and glue to make dimensional star. 
This paper was gold on one side and kraft paper on other side.  I ended up using the kraft paper side as I liked  the look the best.