Just Kitting Studio Items for Sale

Showing posts with label Plantin Schoolbook. Show all posts

Wednesday, July 18, 2012

CW Bubbilicious Buttons and Brads

Hope you are having a fun and sunny Summer.  This week at Cooking with Cricut the challenge is to use Buttons or Brads on your layout.  I decided to use this adorable bear blowing bubbles from Melin at Paper Crafting World.  Isn't this little bear just the cutest?  You can also find a cute little boy bear at PCW.  
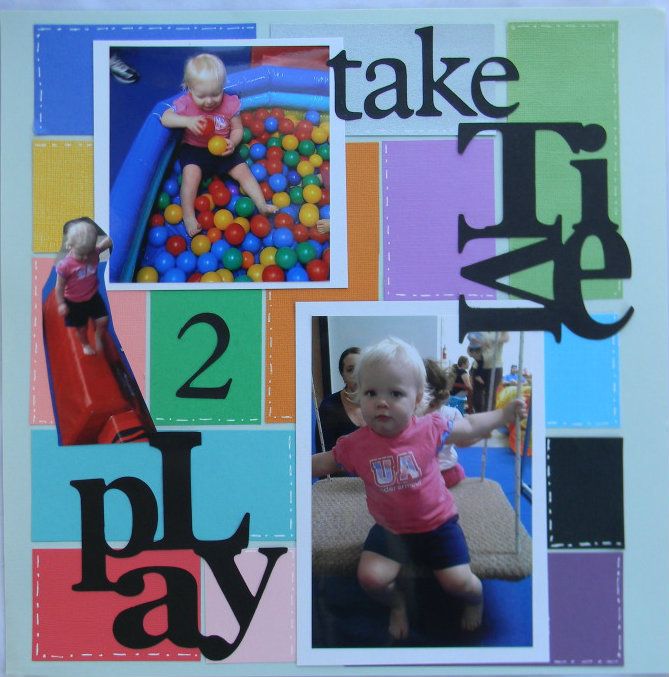
  Well let me just say this layout actually wasn't at all what I planned, but I am happy with the way it came out.  I wasn't paying attention to the size I was cutting my bear pieces so they barely fit on the 12 x 12 page.  I put them together and then came up with the idea of adding the picture of my granddaughter Katie blowing bubbles in the little bears lap.  I used the bubbles from the file as well as large blue buttons.  The title was cut from Plantin Schoolbook Roly Poly font at 2.35 inches.  
For the bubbles I also added some Diamond Stickles and Glossy Accents to give them sheen.  there is also white gel pen on the letters.  I also added Googly eyes to the bear.  
Here are more pics of Katie blowing bubbles and playing in her water bucket.  
One big cute teddy bear and one little happy girl
I hope you loved my layout.  I would love for you to leave a comment.  
Remember you have until next Tuesday to enter the Buttons and Brads challenge at Cooking with Cricut.  I can't wait to see your amazing projects.  Happy Craftin!
Also don't forget to join the CWC and PWC Designers this Saturday and Sunday for the 

Tuesday, July 3, 2012

I am going to teach Scrapbook classes and layout for Child's Play

I am so excited so I have to share my news.  My local Scrapbook Store (which is 20 minutes away) has asked me to teach classes starting next month.  I took my first pages in today.  I will doing 2 double page layouts using the new Graphic 45 Halloween layout.  I will teach each class twice in one month and will be doing monthly classes.  I cannot tell you how excited I am.  
Here is a layout I did for the Child's Play challenge- Board Game Challenge- Rush Hour.
Remember this game?  My girls used to love playing this.  
Here is my take on the challenge.  I used the colors to make a background.  The strips were cut 2 x 2, 2 x 3 and 2 x 4.  The title words take and 2 came from Plantin Schoolbook cartridge and the Time and play came from Graphically Speaking.  I added some white gel pen stitching.  
Simple and quick!

Monday, May 28, 2012

FCCB Memorial Day challenge

I will have two posts today. 
The first for Fantabulous Cricut Challenge Blog "Memorial Day" 
and the second for Bitten by the Bug 2 "Garden Theme"


Happy Memorial Day to you all and I hope you had a fun and safe weekend.  Today at FCCB the challenge is Memorial Day- Make a project using the color red plus anything that makes you think of Memorial Day (ie. a flag, military symbol, or poppy).

For my project I used A Child's Year , Plantin Schoolbook and Straight from the Nest.  
I am sorry I am at my daughters and do not have the book I write all my info in so cannot give you the exact  cut sizes. 
Memorial Day weekend always seems to flag the beginning of Summer so I entitled my layout 
It's Summer.  
Then  I made all these cut cuts from A Child's Year and these cute little pinwheels.  The pinwheels are fastened with brads so as to allow them to move.  
Paper is from K and Company and Quick Quotes.  


I hope you will join us this week for the FCCB challenge.  We always love for you to join us for these great challenges.  

Thursday, May 17, 2012

Sweet Sassyy Diva Design Team Post- Use three or more Cricut carts

Hello everyone  I hope you all had a wonderful Mother's Day this past weekend.  
This week for Sweet Sassy Diva Design Team we were challenged to use three or more Cricut carts on our project.  I decided to work on a layout of my oldest granddaughter getting her first haircut.  
The paper I used is from Mambi and was purchased at Joanns.  
I wanted to make a bright cheerful layout and use the red in Katie's shirt. 
The pictures were taken in February when Katie was 25 months old.  
As most of you know who have seen my layouts before Katie has the most gorgeous curly hair which runs in our family.  Everywhere we go people want to touch her hair but as you can imagine it gets quite tangled at times.  
My friend Liz is a beautician so we asked her to do the honors.  We weren't certain how she would react but she sat on Mom's lap eating her goldfish crackers and was fine through the whole process.  
The title Kids, Kuts, and Kurls I found in the awesome book Inspiration Station by Betsy Flot.  
This is an excellent book if you make a lot of layouts.  
I used the Plantin Schoolbook Roly Poly font cut at 1.5 inches and glued to 2 1/2 inch strips of yellow polka dot paper.  


The hair dryer comes from the Paisley cart page 59 cut at 5 inches. 
The comb and brush from the Slumber Party cart cut at 5 inches.
I added a few doodles to the cuts using my Spectrum Noir Alcohol Markers.  
I hope you enjoyed my layout and will come back this week to see what the other Design Team members create with their Cricut carts.  Happy craftin!  Suzanne

Tuesday, May 15, 2012

Katie's First Haircut LO- for two challenges

Today I am sharing a layout I did over the weekend for Child's Play .  The challenge is to use the game of  "Life" as your inspiration.  Now I know that doesn't mean I have to take it literally but I had a lot of fun doing that.  I also had in mind to use these pictures for the Cricut Circle Monthly Challenge Milestones and Memories.  The pictures are of my oldest granddaughter getting her first haircut at my friends house with her family all there.  
I thought these two challenges went perfectly together.  
I used the box as my inspirations rather than the game.  

Here is the inspirations photo from "Child's Play.  

Recipe:
Title cut from Plantin Schoolbook Cricut Cart Life at 1.5 inches/shadow 1.5 inches 
Katie's first haircut and Family affair cut at 1 inch from Kate's ABC
Brush and comb cut at 5 inches from Slumber Party cartridge
Dryer cut at 4 inches from Paisley cartridge 

Wednesday, July 20, 2011

Playtime Layout using Christmas carts and update

Update: I am still staying with my daughter to help with new granddaughter who is  5 days old. Remember all comments this month go in a drawing till the end July for a $25 gift certificate to M's or J's in celebration of my 6 month blogaversary.  
Also Bobbi Jo of Sweet Sassy Diva is at CHA so check out her blog for pictures and videos.   
This is my project for the Sweet Sassy Diva Design Team today.  
I am  sharing with you today a layout I did with Christmas Solutions and Jolly Holidays.  I  had a hard time starting with this challenge that Bobbi Jo gave us.  I do love trying to use Cricut cart cuts in a different way. This idea came to me as I am trying to get a bunch of layouts done for pics of my wonderful granddaughters.   Here is the pictures of the two page layout I came up with starting with the toys.  The paper is from Water Colors by K and company which is a double sided stack I recently bought at Michaels.  
  
The banner is cut from Jolly Holidays at 5.24 on my Gypsy.  I then used my Gypsy to hid the letters on the inside cuts which spelled NOEL.  I then used font and shadow from Plantin cut at 1.25  to spell out PLAYTIME.  The picture on the right is the plain cuts and the right side is with faux stitches on letters.  
I then used the Christmas Solutions cart to cut out the bear and doll at 3 inches and the horse at 4 inches. The little girl is cut at 4 inches from Jolly Holidays and I hid the face and used a Peachy Keen stamp for the face.  I cut off the mittens and used the doll arms cut at 4 inches for her hands.  
I showed the cuts plain and then with Sharpie accents.   
I then decided to make what I call Lollipop flowers which are made from various size circles.  I cut out ornament shapes from the Christmas cart at 2.5, 2.0. 1.75, 1.5 and 1.0  and then trimmed to circles.  Next I layered them alternating paper (double sided) and punched with my Crop-a-dile and added brads for centers.  
I then added photo layout squares 5 x 5 and punched corners with a MS punch.  
Here are some closeups.  
Thanks for stopping by and allowing me to share my layout. I can't wait to see what the other design team members come up with for this challenge.   Thank you again Bobbi Jo for having me on your blog.  

Monday, February 28, 2011

Two Layouts- One for CC Weekly Challenge

The first  layout is for the weekly CC challenge. The Challenge: Include a Fairytale or Folklore figure in your project (princesses, gnomes, etc. I knew right away I wanted to get out My Community and do a layout of the Three Bears.  The bears were cut from My Community at ", 4 1'2" and 4 ".  The bowls were cut at 2 1'2, 2", and1 1'2".  Goldilocks was cut at 5 ".  I used the Gingerbread house on the same cart but turned the snow parts into straw by embossing.  The forest trees came form Campout and were also cut at 5 ".  The greenery was from Plantin Schoolbook.  I used a lot of different embossing folders  for texture and chalked the edges. Also used a bear paw stamp to frame pictures and Silver Sharpie for accents.  

This was a layout I had cut out before CHA for the CC crop.  Finally got around to gluing it together.  I also added the side strips which were done with my new 12 inch Cuttlebug folder  I used light blue glitter cordinations paper and then ran Tim Holtz purple distressed ink over the top. 


Tuesday, February 1, 2011

CC Weekly Challenge card

This is the card I made for the Weekly CC challenge.  We were to make something using a cart you got with your machine.  I used Plantin Schoolbook and designed my project on the Gypsy.  The card is 5 x 7.  The blue piece I cut at 4 1/2 x 6 1/2 and embossed with Divine Swirls or Coredinations paper which I then sanded.  The first cut on the Cricut was the green which is 4 x 6 and the circle in the center is 3.5.  Then  I went to page 69 for the scenery cuts.  I cut the flowers (1) and the grass (2 x) at .75.  The houses, trees and mountains were cut at 1.50.  all the cuts are 4.25 long to fill the circle.  I also did one more mountain cut same size flipped.  The letters for title also PS are 1 inch.  The tag is from page 71  italic tag which has two holes.  I made my own shadow.  I chalked all the cuts and then glued the pieces together to form the scene.  I added a few MS punch stars from white glitter paper,  I added brads on tag, and stickles for flowers.